Posted on

Subaru Impreza TD05H-16G turbine housing porting

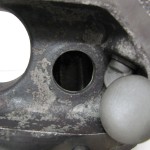
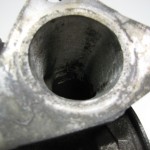
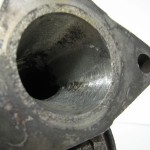
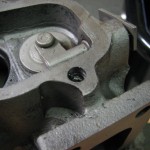
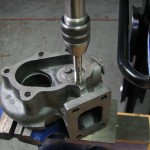
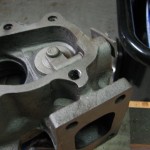
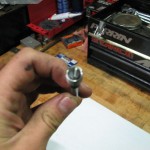
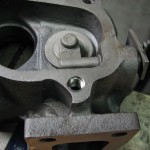
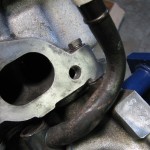
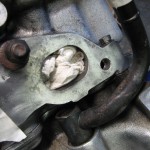
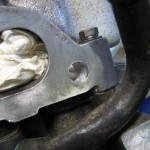
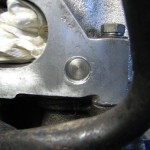
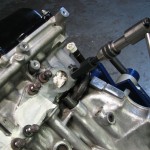
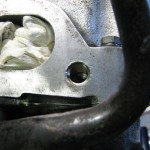
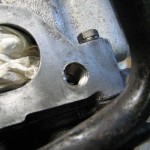
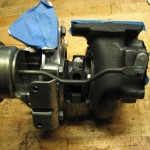
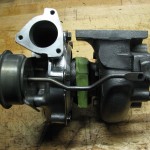
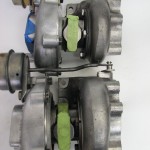
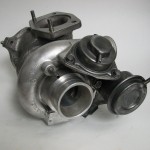
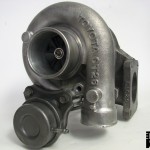
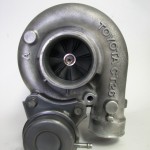
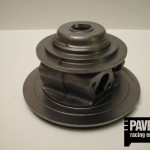
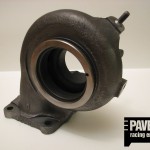
This is another turbine housing porting and blending job we did. This is a purposeful modification and not just another thing to add to your “modifications list”. Main purpose of turbine housing porting is to reshape the inlet and remove airflow restriction to the internal wastegate. Restrictive wastegate castings can lead to boost creep condition. We blend and reshape the turbine housing to increase flow to the wastegate valve and improve boost pressure control. Porting of the turbine housing, as typically performed by tuner shops, can actually be detrimental to performance and durability of the turbocharger. Turbocharger manufacturers spend millions of dollars on research and development of the optimal housing size and shape. Porting and removing of material will increase housing inner dimensions and leads to premature cracking. We blend casting marks of the turbine housing and polish it. Only material removal we do benefits wastegate exhaust gas flow characteristics.

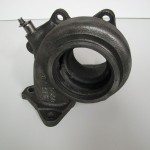
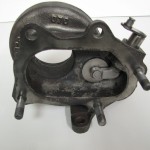
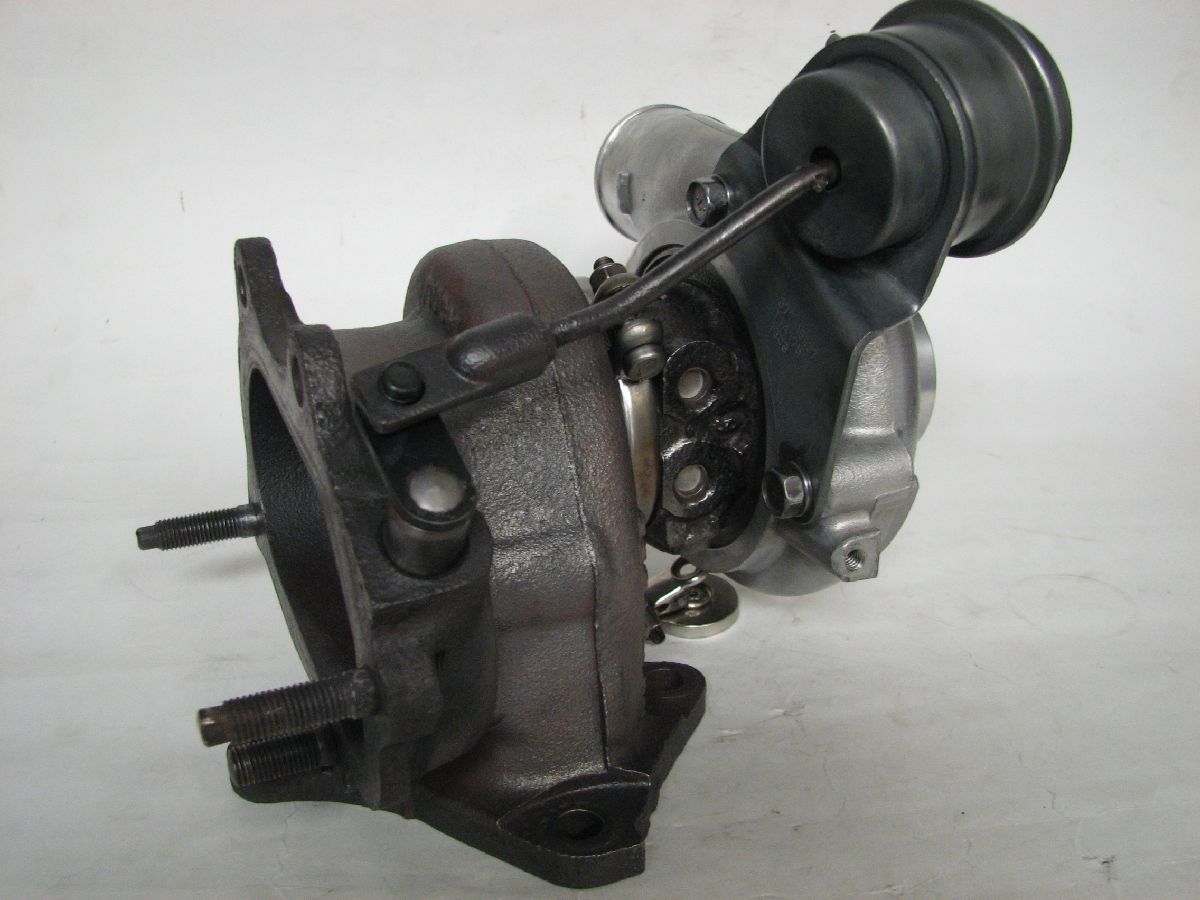
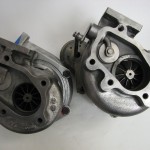
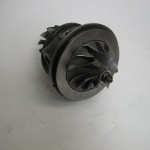
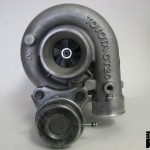
This turbine housing porting and reshaping performed on a MHI(Mitsubishi Heavy Industries) TD05H-16G turbo, designed for a Subaru application. This turbo uses a 7cm turbine housing.

This turbo is a direct bolt-on for the following applications:

  • 2002-2006 Subaru Impreza WRX
  • 2004-2008 Subaru Impreza STI
  • 2003 Saab 9-2x
Before and after pictures:


Posted on

Helicoil thread repair demonstration

For your convenience we added hyperlinks to important topics. All words in bolt are hyperlinked to websites relating to products or topics discussed.

This page is dedicated to show and teach how helicoil thread repairs are performed. We will be performing 2 separate thread repairs using Helicoil thread repair kit. One repair will be done in an aluminum cylinder head and the other one in a cast iron turbocharger turbine housing.

In both cases threads were damaged beyond repair, or “chasing”, with a thread tap. There are many different thread repair systems. Helicoil, Recoil, Time-Sert,  and Dorman are just some of the few companies who manufacture thread repair systems. One thing to remember; you cannot mix thread taps and inserts between different brands.

We chose to use a Heli-coil brand thread repair kits for both these jobs.

Principle of operation:

Step 1:
Drill out the damaged threads using the 
drill size specified in the HeliCoil catalog. 
Drill to a sufficient depth to accommodate 
the HeliCoil insert length and the bolt or 
screw being used.
Step 2:
Tap the hole using the HeliCoil tap. Tap the hole to 
sufficient depth to accommodate the HeliCoil insert 
length and the bolt or screw being used.
Step 3:
Place the HeliCoil insert onto the mandrel 
of the HeliCoil installation tool. Place the 
HeliCoil installation tool over the hole and 
wind the HeliCoil insert into the hole until 
the top coil is 1/4 to 1/2 turn below the 
top surface.
Step 4:
The tang must be removed to allow full passage 
of the bolt or screw through the HeliCoil insert. 
Place the tang break-off tool squarely on the 
tang of the HeliCoil insert and then give it a sharp 
blow with a hammer. 
For HeliCoil inserts with diameters bigger than 
1/2 inch, 12mm, and for spark plug inserts, use 
long nosed pliers to remove the tang. Hold the 
tang with the pliers, bend it alternately in and out 
until it comes free.
Click each picture for step-by-step description

Posted on

Nissan SR20DET connecting rod weight matching service

This is another service we offer here at Pavel’s Racing Engines. We can weight match, aka balance, your engine’s connecting rods and install ARP rod bolt. As a sample of our work we have a set of Nissan SR20DET connecting rods. We can provide this service for any set of connecting rods; motorcycle, automotive, truck, industrial, import, domestic, marine, we can do it all. We have precision scales to weight match every connecting rod to within 0.5 grams of each other. We weight match the small and big end of the rod. We identify each bolt and provide rod bolt log sheet with every connecting rod order. This way you can monitor rod bolt stretch and replace worn bolts before catastrophic engine failure occurs. All connecting rod bolts replaced with appropriate application kit for one of the best hardware manufacturers in the world, Automotive RAcing Products (ARP).


We performed the following services on the connecting rod:

  • -Check for bend and twist, and correct if necessary
  • -Check piston pin bushing
  • -Weight match small and big ends of connecting rods
  • -Install ARP connecting rod bolts
  • -Engrave each bolt for identification, measure it’s free length, and record in the “Rod Bolt Log Sheet”
  • -Compare “torque” vs “stretch” methods for bolt validation
  • -All bolts torque using ARP Ultra-Torque Moly Lubricant
___________________________________________________________________________________
We offer connecting rod weight matching, balancing, and ARP rod bolt installation for the following engines:
  • -Toyota: 2JZGE, 2JZGTE, 1JZGTE, 4AGE, 4AGZE, 1UZFE
  • -Nissan: SR20DET, SR20DE, SR20VE, KA24E, KA24DE, VG30DE, VG30DETT, VQ35DE, VQ40DE, RB20DET, RB25DET, RB26DETT
  • -Subaru: EJ205, EJ207, EJ20T, EJ22t, EJ255, EJ257
  • -BMW: M50, M52, M54, S50, S52, S54
___________________________________________________________________________________

Pictures of completed set:


Posted on

Subaru Impreza WRX 02-06 TD04H-13T Turbo Rebuild

This yet another type of Subaru turbo we rebuild at PRE. This unit came in poor condition. A lot of shaft play, smoking and burning oil, and visibly damaged compressor wheel. Upon disassembly, cleaning, and inspection we decided this turbo still qualifies for our Basic Turbo Rebuilt Service with the only additional cost being new compressor wheel. Ne standard size journal bearings were measured with a micrometer and bearing housing clearance checked using a bore gauge. Luckily journal bearing clearance was within factory specification. This means we did not need to hone the housing and install oversized journal bearings. Compressor wheel showed visible wear which was confirmed with a digital caliper measurement. It was replaced with a brand new unit. Compressor housing clearance was checked and found to be acceptable. Compressor wheel wear did not leave grooved marking of the housing. Turbine rotor shaft was measured to be within factory specifications on all dimensions and was saved. We micropolished the shaft and removed any small imperfections. Rotor assembly was balanced with new compressor wheel and turbocharger assembled.

Pictures of individual components:

Posted on

Nissan SR20DET cylinder head rebuild process

Here is another SR20DET cylinder head we rebuilt at PRE. This cylinder head came to us in very poor condition. Customer wanted a OEM style rebuild. Upon complete disassembly and inspection it became obvious actual condition of the cylinder head. Cylinder head gasket mating surface was slightly warped, exhaust valve guides worn beyond factory limit, valves pitted, and valve seats showed unacceptable wear. Since this cylinder head is going on a performance engine intended for high speed auto cross and drifting we had to make sure every specification was better than factory. This is what separates engine builders, attention to detail.

Work performed:

Cylinder head gasket mating surface checked using precision straight edge
Valve seats checked for out-of-round using precision seat concentricity gauge
All valves checked for bends and out-of-round using v-block and dial indicator
Exhaust guide clearances checked using Sunnen P310 valve guide gauge
Exhaust guides replaced with manganese bronze units
Exhaust guides honed to spec using Sunnen P190 valve guide hone
All valves refaced using IDL/Sunnen valve grinding/refacing machine
All valve seats recut using Serdi 100 valve seat cutting system
All valve hand lapped using grinding compound and checked for seal using machinists blue
Cylinder head gasket mating surface deck milled and hand stoned to prepare for metal head gasket
Viton valve stem seals
All valve springs, retainers, spring seats, and keepers checked for rust, pitting, and cleaned
All valves springs checked for pressure at install height and full lift using Rimac valve spring tester
Cylinder head carefully assembled and bagged for storage awaiting customer pick-up


Pictures of the cylinder head during the rebuild process:

Posted on

BMW S52 cylinder head spark plug thread repair

This is a custom cylinder head repair we did at PRE. Spark plug on cylinder 6 was not torqued down properly, vibrated loose, and finally ripped out all the thread. Heli-coil spark plug thread repair kit was of no help in this situation; too much material was torn out. This kind of repair cannot be done with the cylinder head installed on the block. We removed the head from the block, completely disassembled it, and inspected all components for wear. Cylinder head was checked for cracks with a Magna-Flux system. BWM M50/M52/S50/S52 head are notorious for cracking into the water jacket near the exhaust valves. After passing crack inspection the head was cleaned and valve seats checked for concentricity. Cylinder head was also checked for straightness of the deck mating surface. After passing all of the above tests we began the repair process. Cylinder head was mounted in a Bridgeport style mill and spark plug hole counter bored to a specific size. Additional counter bored “step” was machined and 4 spots for laser welding of the fitting. An aluminum fitting was precise machined in a lathe with a standard M14x1.5 spark plug thread pitch on the inside and a precise side on the outside diameter. Aluminum fitting was machined to have a 0.002″ inch interference press fit into the head. Also a pilot tool was machined to ease fitting installation. After all machining work was done the cylinder was heated up, fitting cooled, and pressed in with a light coat of green “sleeve type” Loc-tite. Afterwards the fitting was laser welded in 4 designated spots in the head. Combustion chamber was vacuum checked for seal and volume checked to make sure all cylinders maintained same compression ratio. Cylinder head was deck mill faced and hand stoned to ensure perfect mating surface for a factory or performance multi layer steel head gasket. All valves were cleaned and refaced using a Kwikway valve grinding machine. Valve stem seals replaced with genuine OEM BMW parts. All valve springs we examined and spring pressures checked using a Rimac valve spring tester.

Pictures of individual machined components and finished work:

Posted on 8 Comments

Garrett T28 turbo rebuild and journal bearing conversion 0.86A/R

This is a custom turbo we built for a customer in Pennsylvania. This project started with a damaged ball bearing Garrett T28 turbocharger. Since the turbo cannot be serviced or rebuilt we converted it to journal bearing system. We build these turbos usually with a more popular 0.64A/R turbine housing. This time the customer requested a bigger turbine rotor shaft and turbine housing to better suit his performance-oriented needs. All machining was performed like a standard Journal Bearing Conversion with the exception of additional machining of the wastegate mount on the compressor housing.

Pictures of the finished unit and individual components for comparison:

Posted on 1 Comment

Volvo V70 TD04H-13T Turbo Rebuild

This was a Volvo turbo rebuild for a customer in Hawaii. He complained of light smoking under heavy load. Prior to complete disassembly and inspection we could not offer a 100% quote, but we had a feeling it was the turbine shaft seal started to wear out. The customer sent us the turbo for a complete overhaul. After complete disassembly and component inspection we diagnosed a worn turbine shaft seal as the culprit of the oil burning, just like we diagnosed over the phone. Luckily our customer maintained his vehicle well and caught the problem before it became an expensive and time consuming ordeal. This turbo needed just the Basic Rebuild Service. All components were cleaned and inspected, while replacing all bearings, seals, 0-rings, and hardware, followed by balancing of the rotor assembly, of course.

APPLICATION:

1997-2000 V70 AWD, V70 XC (Cross Country), S70 AWD, V70 GLT, S70 GLT
Will fit in ANY 1994-2000 FWD or AWD Volvo based on the 850/P80/X70 platform (ie. excluding S80, S40, V40 cars).
This turbo is interchangeable with 13G, 15G, 16T, 18T, and 19T turbos, it’s just that this 13T is slightly smaller.

Pictures of the rebuilt turbo:

Posted on

Toyota CT26 60-1 Turbo Rebuild

This is another CT26 turbo rebuild we performed at PRE. This turbo suffered failure due to mechanic’s error, who left a shop rag in the turbo inlet pipe. Compressor wheel was destroyed and a complete overhaul was a proper solution. This turbocharger will be rebuilt and installed on a customers Toyota Cressida with a 7MGTE engine. This turbo received the typical attention to detail we are use to at PRE. New compressor wheel, new rebuild components, rotor assembly balancing. This turbo received a genuine replacement Garrett 60-1 compressor wheel in the process.

APPLICATION:

1986-1992 Toyota Supra Turbo Mk3… 7MGTE engine
1988-1992 Toyota Cressida… 7MGTE engine
1986-1989 Toyota Celica All-Trac (GT-Four)… 3SGTE engine*
1990-1993 Toyota Celica All-Trac (GT-Four)… 3SGTE engine*
1989-1999 Toyota MR2… 3SGTE engine*
*modifications required

Pictures of rebuilt turbo:

Posted on 1 Comment

Toyota CT26 Turbo Rebuild

Another common turbo we rebuild at PRE. This is a stock CT26 found on the MK3(1986-1992) Toyota Supra. This turbo showed its age when we received it. Worn compressor wheel with chips and bents, excessive wear of the bearing housing, and typical cracks in the turbine housing inlet and wastegate opening. We did a complete restoration on this turbocharger. new compressor wheel, micro-polished turbine rotor shaft, all new bearings, seals, o-rings, and of course, balancing of the rotating assembly. Bearing housing was worn out due to age and possible oil starvation. We honed out the housing to the next size journal bearing. With the exception of bearing housing honing this turbo qualified for our Basic Turbo Rebuild process.

APPLICATION:

1986-1992 Toyota Supra Turbo Mk3… 7MGTE engine
1988-1992 Toyota Cressida… 7MGTE engine
1986-1989 Toyota Celica All-Trac (GT-Four)… 3SGTE engine*
1990-1993 Toyota Celica All-Trac (GT-Four)… 3SGTE engine*
1989-1999 Toyota MR2… 3SGTE engine*
*modifications required

Below you will find pictures of the finished unit as well as individual component pictures before and after the rebuild process.